Welcome to the guided tour of Broadleaf’s v5.2 Admin Tool!
This walkthrough provides a launching point for exploring use case scenarios within Broadleaf’s red-hot hoppin eCommerce retail demo environment, The Heat Clinic! Keep in mind that while already feature-rich, every component of Broadleaf remains fully customizable. Need integrations? Need more field boxes? Need an added functionality that is not readily apparent? No problem. Every Broadleaf solution launched is customized to fit our clients needs.
If you would prefer to view a demo in action, check out our YouTube channel.
Build your platform around your business, not the other way around.
Step 1: Request a Demo
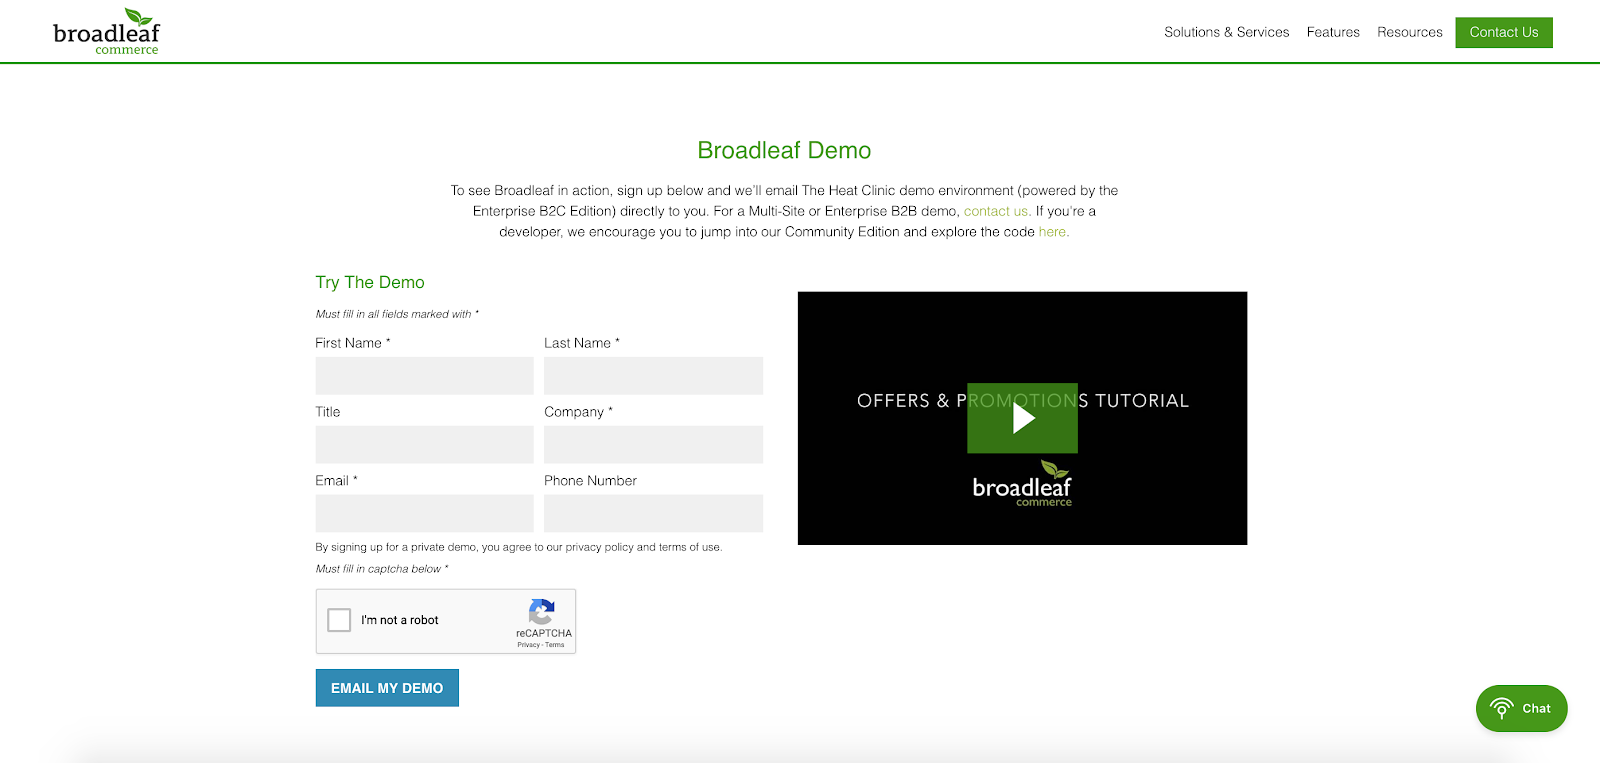
Typically within 30 seconds your private demo environment will reach the email address provided.
Step 2: Launch Your Demo
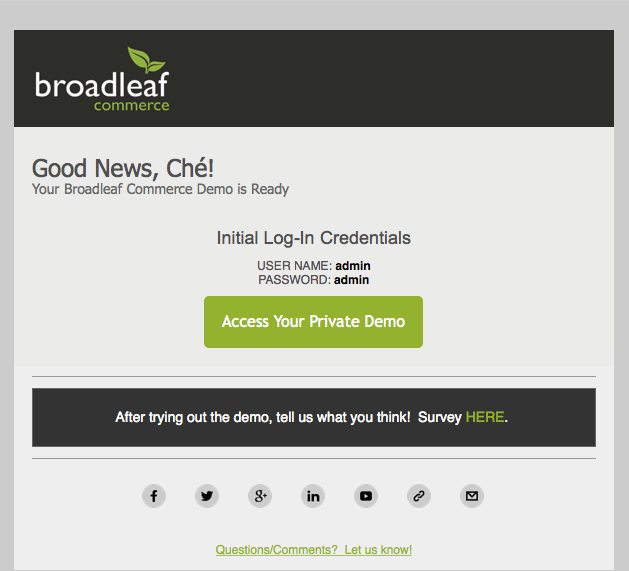
Access to your Private Demo will be sent to the email address you provided. Within the email, click the Access Your Private Demo button. Your Private Demo environment will provision, and you will be brought to a landing page specific to your demo. Feel free to bookmark this page for future use - as new versions of Broadleaf roll out, your demo environment will be automatically updated.
Step 3: Welcome to The Heat Clinic!
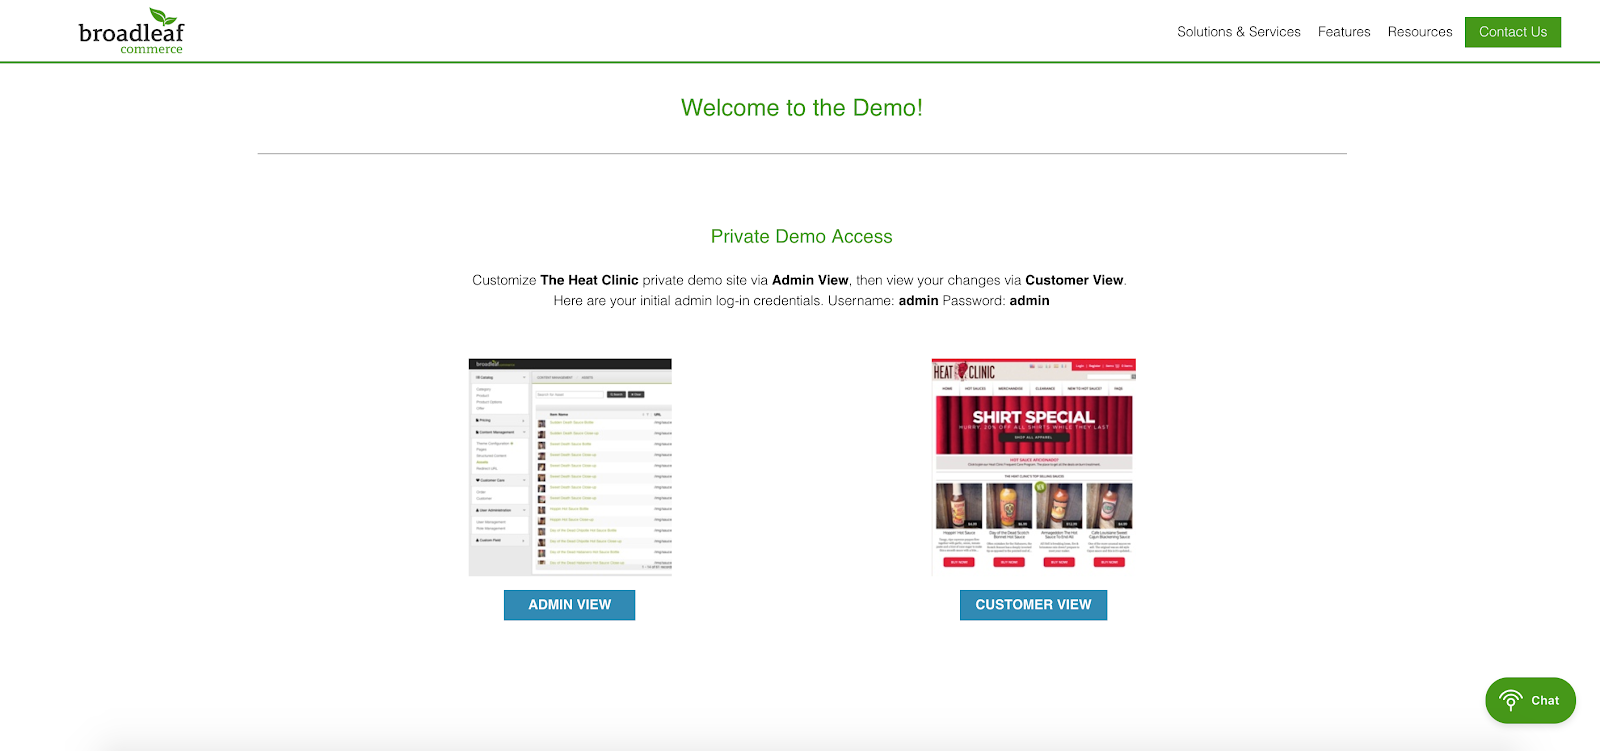
On the landing page, you’ll notice Admin View and Customer View buttons I recommend opening the Admin View in a new tab. Changes made in the Admin Tool will render on the Customer View of the demo. Once in the Admin view tab, log into the Admin Tool with your default login credentials.
Username: admin
Password: admin
Step 4: Let’s Get Acquainted

Catalog
- Under Catalog you will see Catalogs, Categories, Base Product, All Products, Product Bundles, Add-On Products, Product Groups, Product Options, Cart Rules, Manage Inventory, and Locations. Here you have the option to create and edit categories, products, product options (such as sizes/colors/etc), and bundles. This is also where you will manage your inventory and fulfillment locations.
Search
- Under Search you will see Redirects, Relevancy Rules, Facets, Fields, and Type Ahead Configuration. These allow you to make the search on your site as granular as you would like, as well as create redirects for searches that may be close but not the actual product name.
Pricing
- Under Pricing you will see Offers, Price Lists, Contracts, Sales, and Offer Codes. These allow you to manage all pricing, sales, and promotions in one place.
Content
- Under Content you will see Pages, Content Items, Content Targeters, Content Tests, Menus, 'Media Assets', and 'URL Redirects'. Here you can add and edit site navigation tabs, site text, banner ads, image assets, and manipulate URLs.
Customer Care
- Options under Customer Care are Customers, Orders, Fulfillment Orders, Return Authorizations, CSR Orders, Quotes, Customer Segments, Catalog Access Policy, Credit Accounts, and Gift Card Accounts. Under customers you can add and edit customer information and include assigned price lists including tax codes if necessary. The order management system is in place to help with customer care (CMS).
Design
- Under the Design tab are Theme Configurations, Widgets, and Content Zones. Users may manage site themes and templates, including the management of color pallets, images and options.
Site Updates
- Site Updates are the heart of the Workflow and Approval system, containing Changes, Approvals tab, Deployments, and Change History. The progression of changes from inception to launch are managed through this section changes are made in Sandboxes, then passed forward to Changes, then promoted to Approvals. Finally, after changes have launched, they are stored under the Deployments tab. The Change History tab serves as an archive.
Jobs and Processes
- The Jobs and Processes tab contains Scheduled Jobs, Active Processes, and Process History.
Internalization
- The Internalization tab contains Messages and Forms. This allows users to create customized messages.
Settings
- In Settings, create a team to work within the Admin. Add your team members, assign user roles and permissions for seamless team flow. Have 100 team members, but only want one Admin role to approve, schedule, and launch website changes? No problem. Add modules and create new custom fields to your Admin Tool. The possibilities are endless.
Step 5. Enough Chitchat, Time to Explore the Demo!
'50% Off' offers are popular, so let's create one for The Heat Clinic's hot sauces! Here, we'll walk through creating a promotion - feel free to take it further by changing the website colors, adding banner ads, changing sauce names - whatever you wish!
A. CREATE A PROMOTION!

Click 'Pricing'
Click 'Offers'
Click 'Add Offer'
B. ADD OFFER DETAILS/RULES
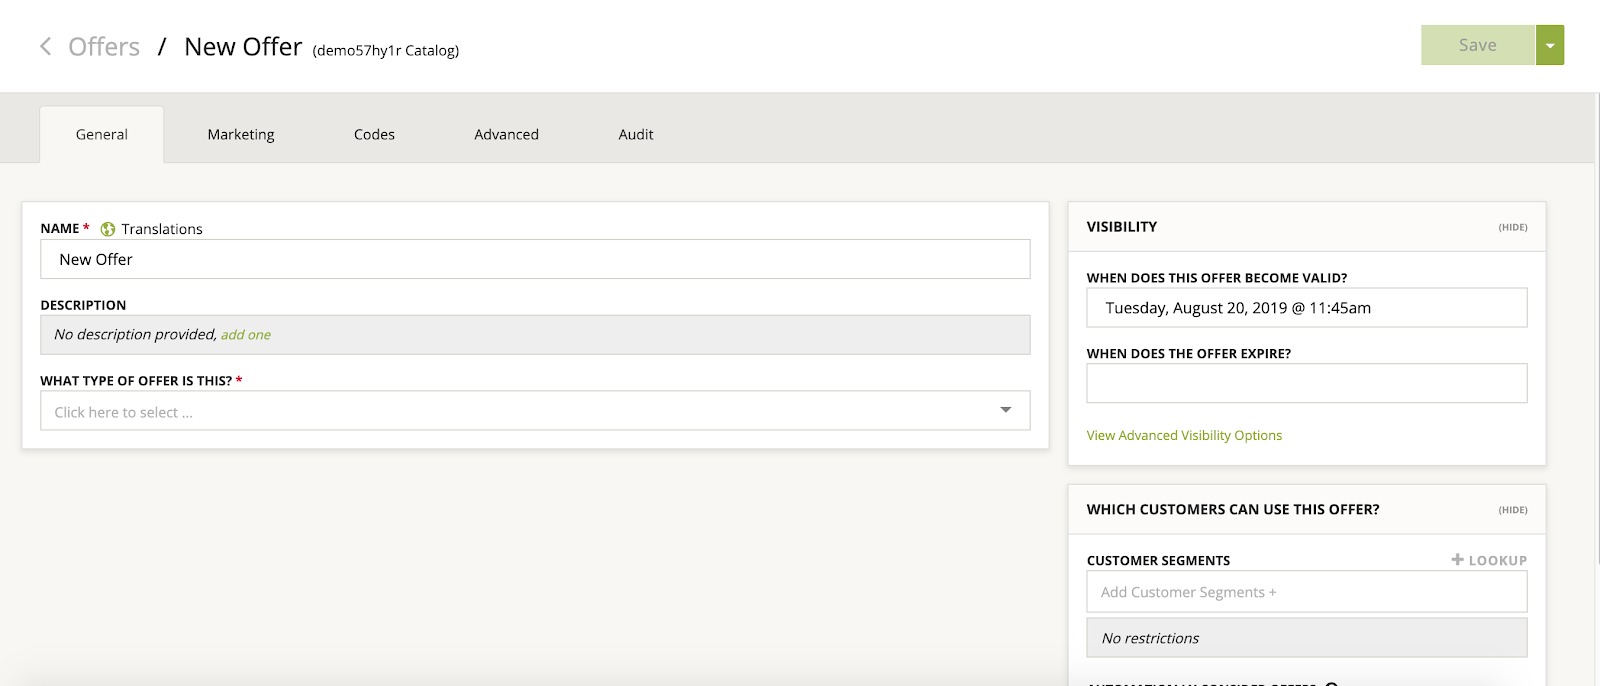
Create a name.
Add a 'Description' to the offer.
This offer will relate to Hot Sauces, so select ' Percent Off Item' under 'Type'.
I would like this offer to be automatically considered.
I add a 'Percent Off' value.
Select the date to start as today if you'd like to start the offer immediately.
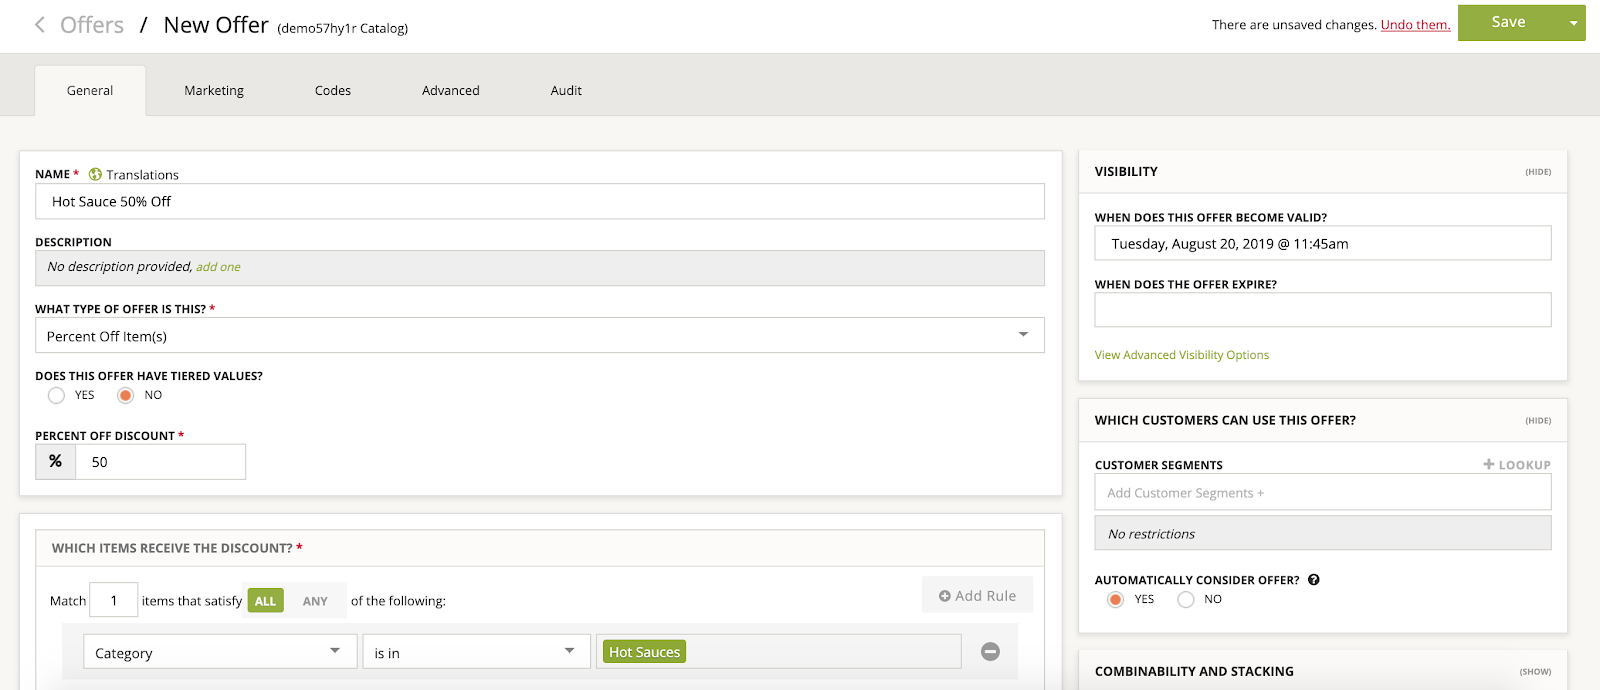
I don't want to add an expiration date for this offer.
I don't want to add a Customer Segment - let's keep it open for the masses.
"Which items receive the discount?"
Add rule, click '+Rule'
'Category-Name' / 'is equal to (ignore case)' / 'hot sauces'
Save.
C. OPEN IN PREVIEW MODE
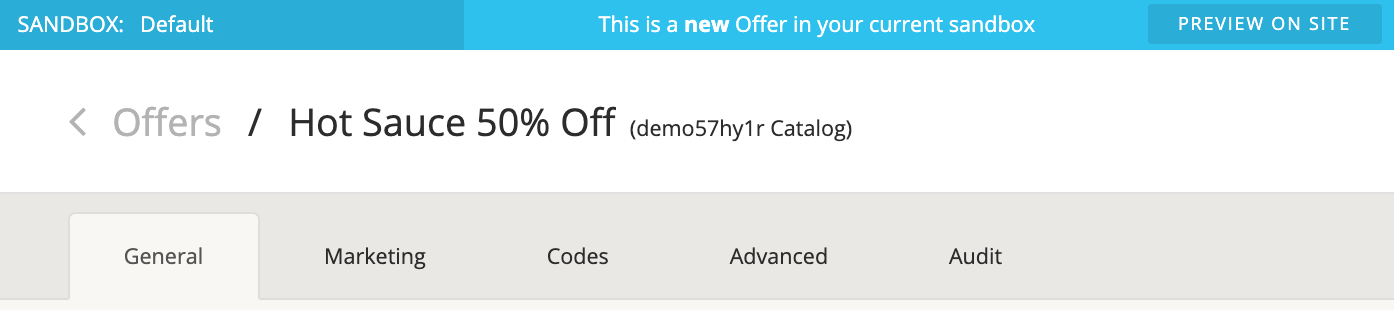
In the top bar, click ?Preview on site?
D. TEST YOUR PROMOTION!
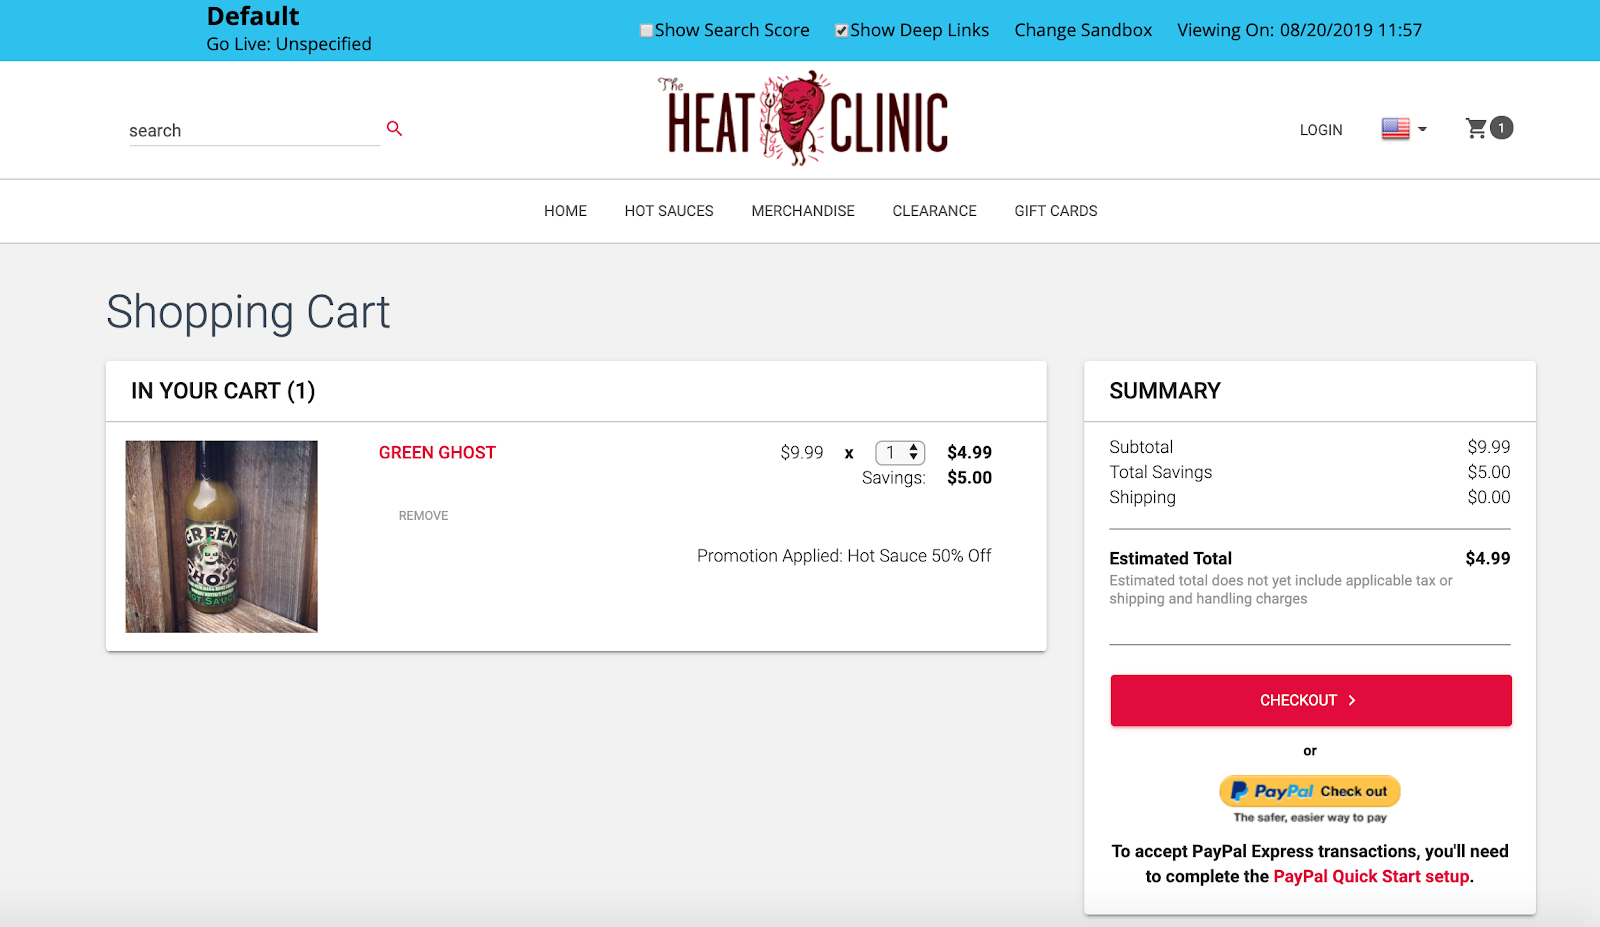
Test it out in preview mode.
Add a hot sauce of your choice to the cart.
For kicks, add something that is not a hot sauce.
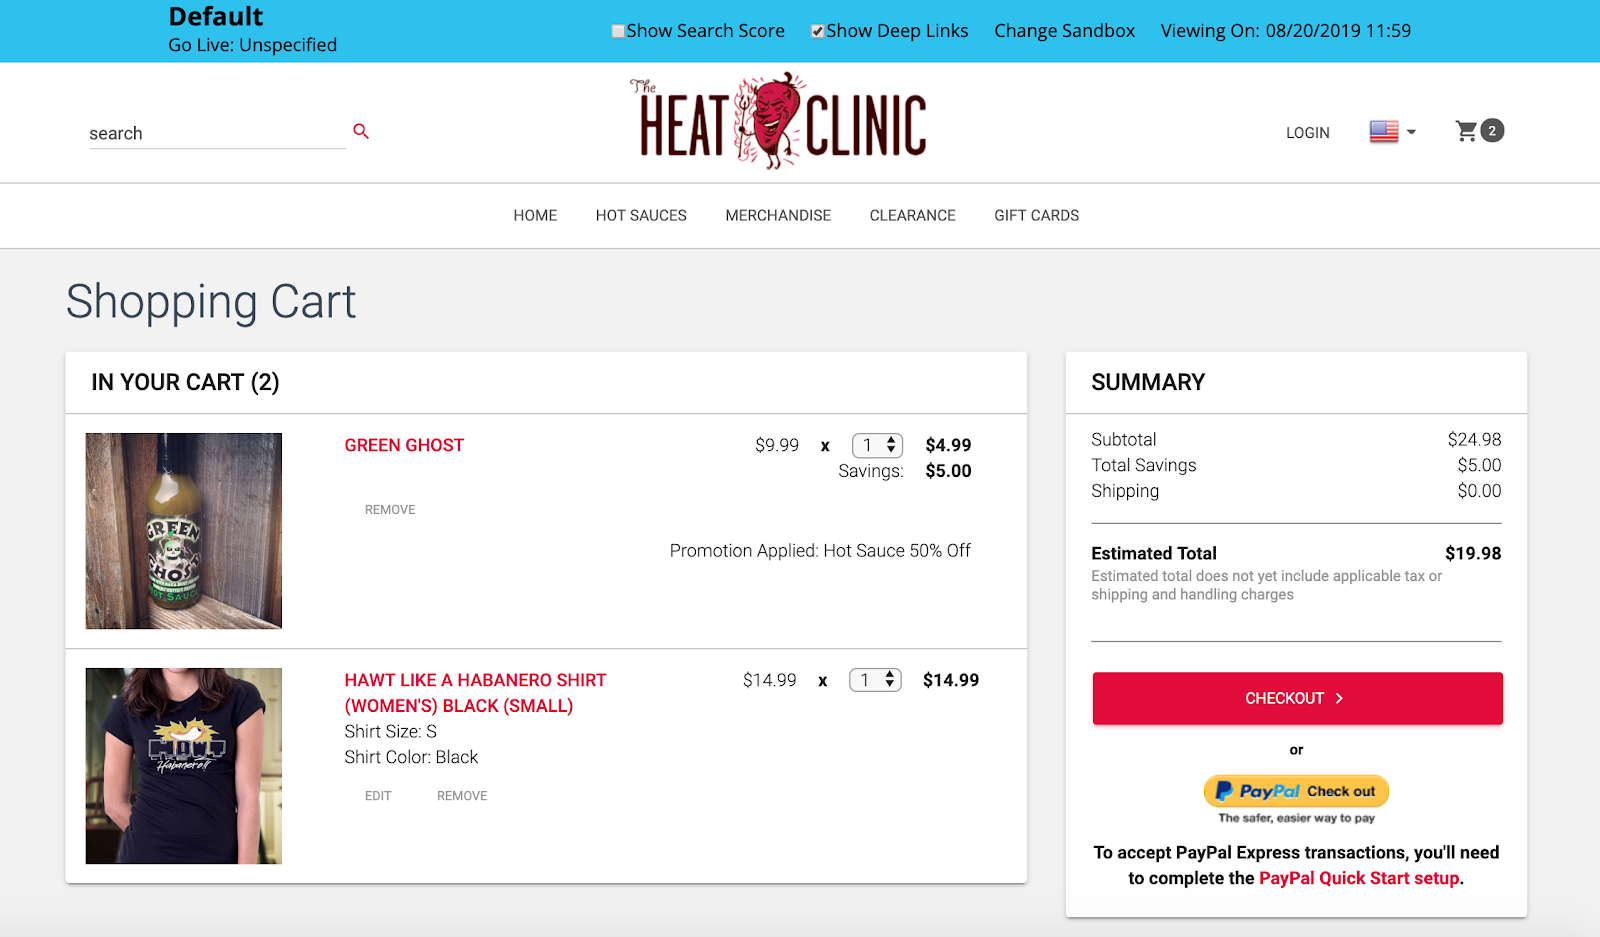
The 50% off hot sauces discount appears in the cart.
6. Ready to Deploy? Welcome to Broadleaf Workflow!
In your demo, you are the marketing/merchandising team as well as the marketing/merchandising manager (unless you decide to make new users and assign roles to use the demo across multiple users we encourage this!).
A. SUBMIT YOUR SANDBOX CHANGES TO BE APPROVED BY SITE ADMINISTRATOR/MANAGER.
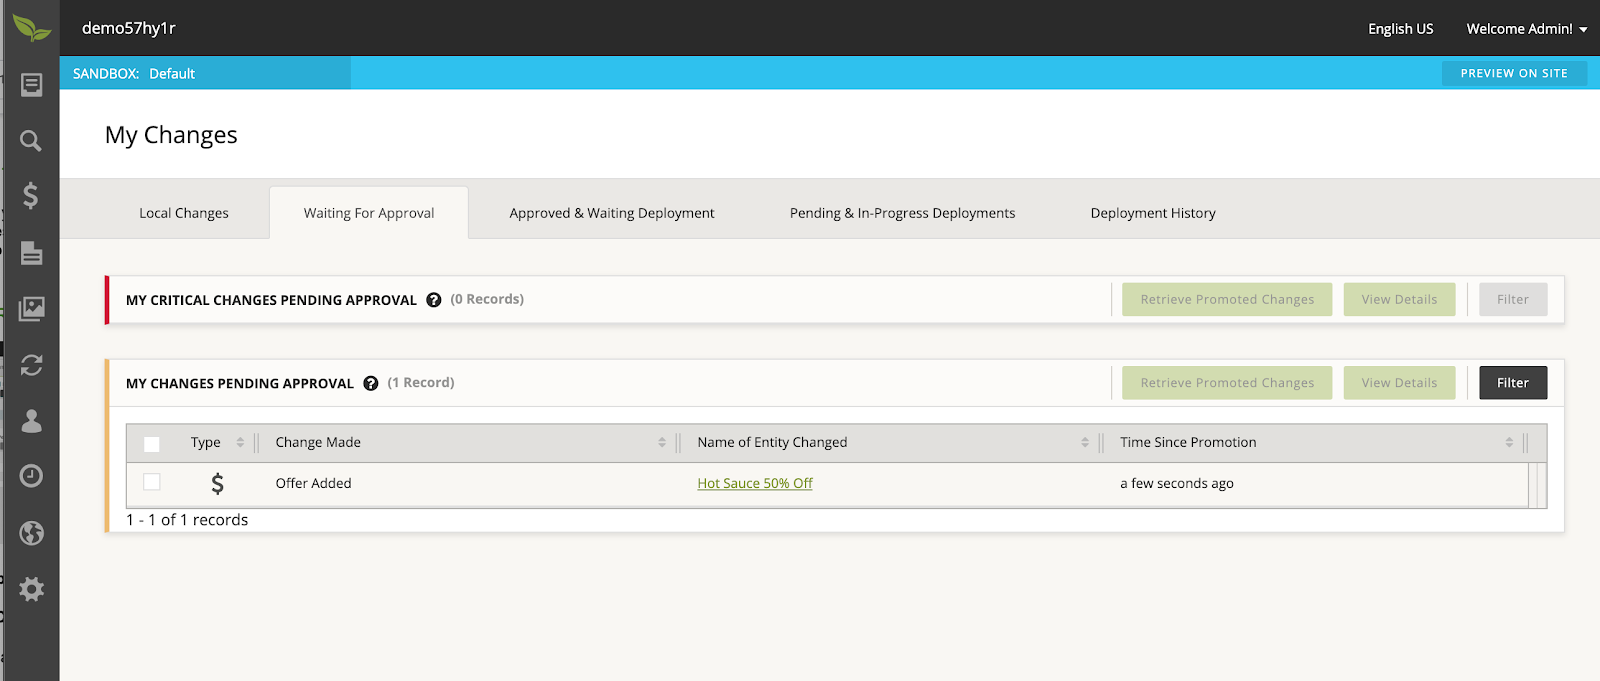
Go to ' Site Updates'
Click on ' My Changes'
Select your change.
Click ' Promote'
B. NOW IT'S TIME TO PLAY MANAGER TO ALLOW YOUR CHANGE TO MOVE FROM THE SANDBOX TO DEPLOYMENT.
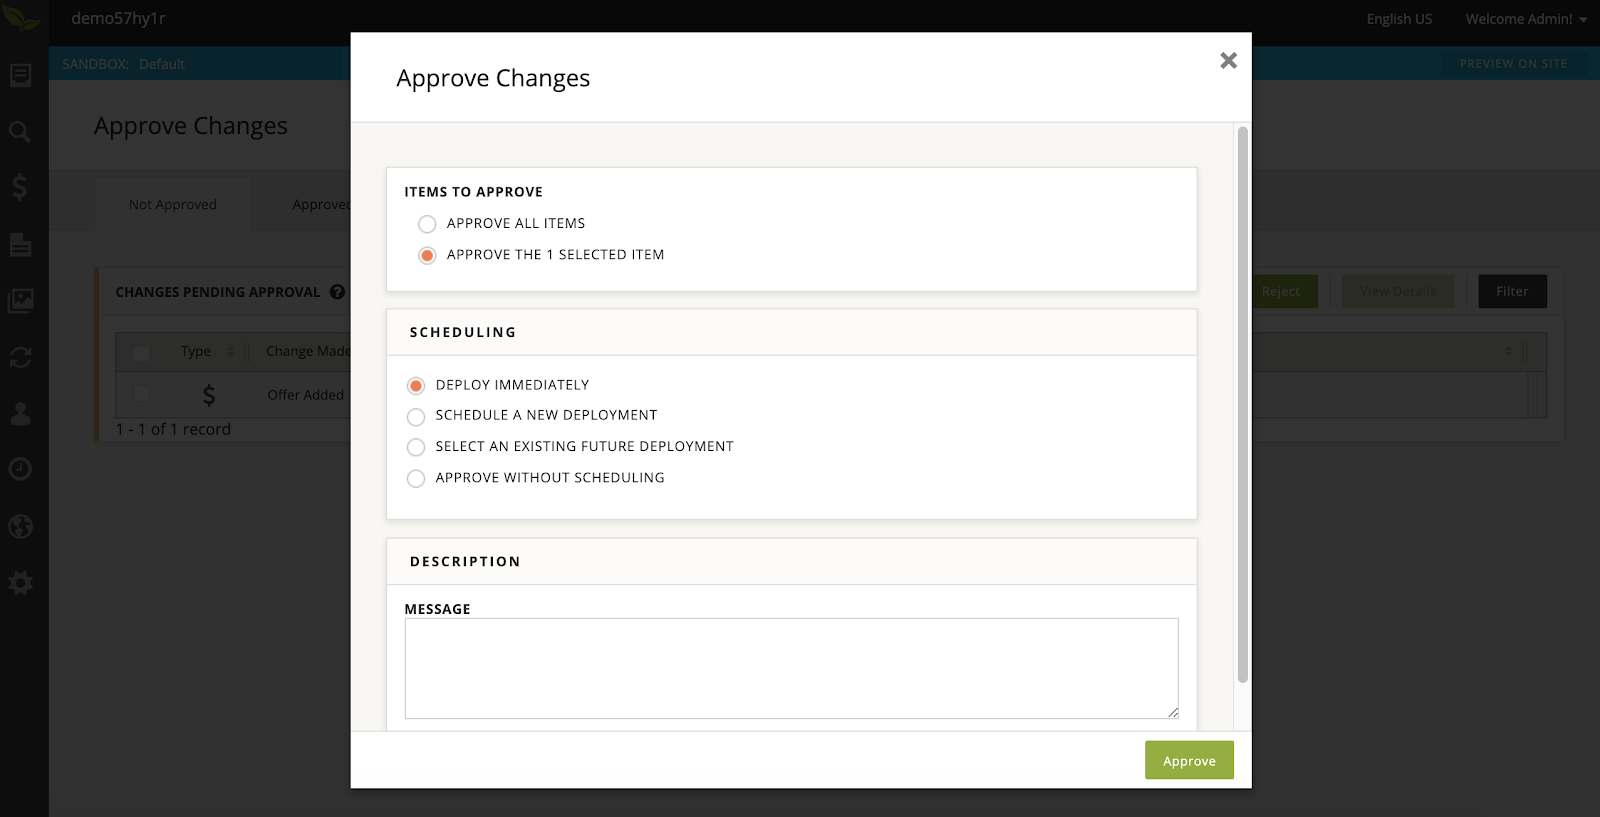
Go to 'Approvals'
Select your change.
Approve, select ' Deploy Immediately'
You may also send a note back to the originator of the change... in this case it would be yourself.
Step 7: Take Your Site Changes for a Spin!
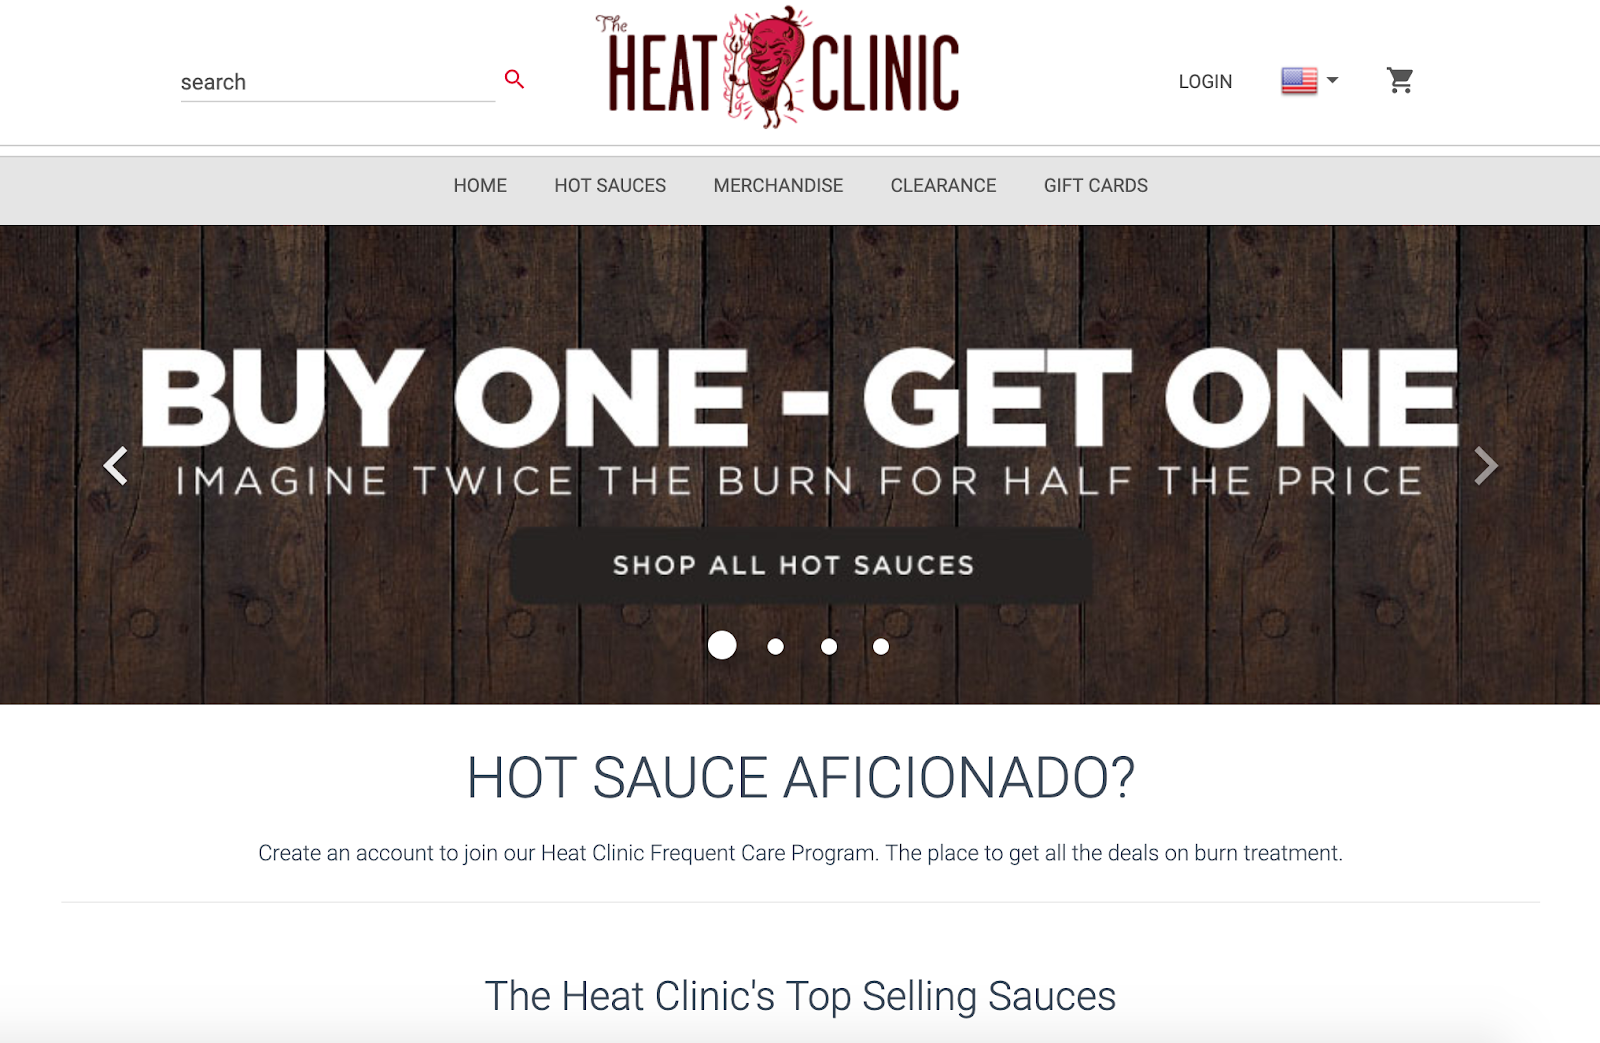
Here, you experience what an actual customer would see if shopping on The Heat Clinic site.
Log out.
Go back to the original landing page for your private demo.
Click ' Customer View' to see your changes in action!
At this point, you have completed the formal introduction to the Broadleaf Admin Tool! The possibilities for manipulating The Heat Clinic demo are limitless if you have an enterprise need for the Broadleaf Platform, would like a 1:1 enterprise demo, or have questions regarding integrations and customization, please feel free to reach out.
Enjoy!
